Friday, September 27, 2013

Creative Bead Chat Thank You Blog Hop

Hmmm...so what is Creative Bead Chat?

"A home for creative component and jewelry designers to share new creations, tool tips and help build our creativity and sales ! A home for new designers as well experienced to share your experiences and ask questions. Ultimately we are a team and work together towards the goal of being proud of our accomplishments and accomplishing our dreams"

It was started by Melinda Orr and Marla James, and supported by a LOT of my friends! What started as a Facebook group has grown into a ning website of its own, called Artisan Whimsy. It has great learning resources, contests, challenges, giveaways and even a marketplace! The latest addition is a magazine of its own. And the magazine is ah-ma-zing! Like, seriously! You can read the August issue here.

The best part though, is the camaraderie and friendships being made there everyday!

The latest giveaway was hosted in July to mark the Facebook group reaching 2000 members! Over 50 components and finished jewelry pieces were given away! I had put my name in the hat, but didn't win anything. Nevertheless, I do want to participate in this blog hop to say thanks to everyone who helped make this happen!

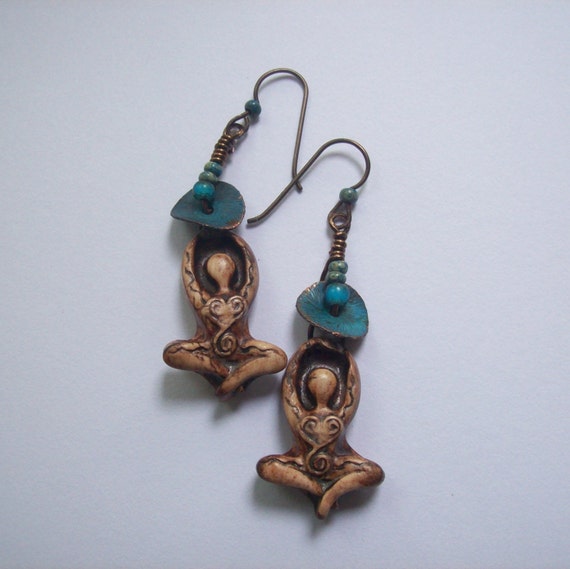
I will start off with a pair of earrings I made a few minutes ago, last minute creation, of course :) The photos are not the best, but I wanted to make it to this hop, and so here they are!

These earrings feature components by my bead mommy, Sharyl McMillian-Nelson. You can look up that post to see the cool stuff I have received from her. What I love about her is that she is always evolving, making new components, adding on to what she learned and there is always something different and new in her shop Sharyl's Jewelry .

The polymer clay beads are a gift from my friend Lisa Caryl. She makes the most fantastic polymer clay beads and will be opening her shop on etsy soon! 

Anyhow...here's what I made:


I punched holes in the components, and added color with thread. I do love them a lot!

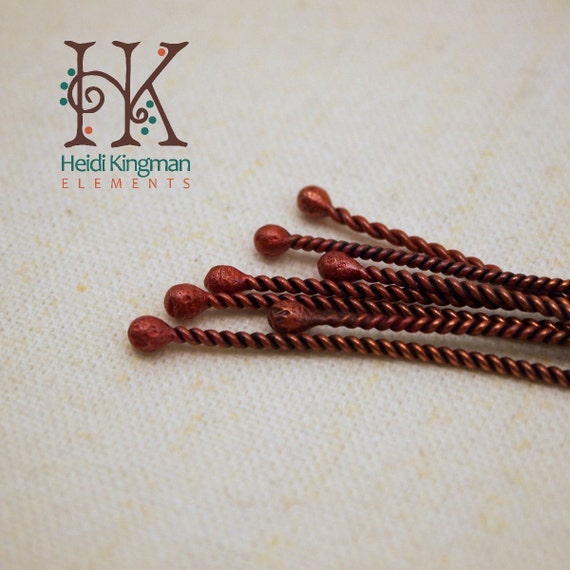
I bought these headpins from Heidi Kingman after I saw them on the giveaway, and didn't win. I love them a lot, and hence they are being hoarded :)


And now I will share jewelry I have made with components from other donors:

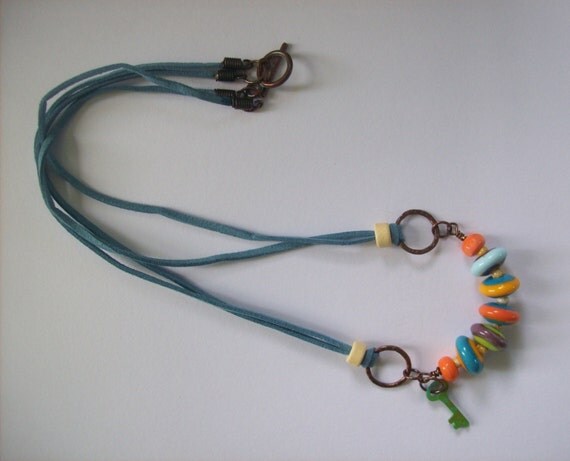
Marla has gifted me a whole lot of cool components, I am still working my way through them. Here's a necklace I made with an "arrowhead"


I received this blue focal bead as part of her Echo Creative Club. Its still available in my shop (click on the picture to go to the listing)


Shelley Graham Turner of Tori Sophia
Shelley gifted me these cute little turquoise beads :) I super love these earrings!
They are still available in my shop (click on the picture to go to the listing)

Marti Conrad of Marti's Buttons and Beads
This focal was a gift from Marti. The bracelet is available in a second shop where I sometimes list my items. Please click on the picture to go to the listing.


Janice Everett of J-Lynn Jewels

This art tile was an instant hit! I bought these at her holiday sale last year. Am looking forward to the next one so I can stock up!


And finally, one of my favorite people, Emma Todd of A Polymer Penchant! 
She gifted these discs to me along with an order I had placed. These are available, but not yet listed, do let me know if you are interested!


Here are the rest of the participants of the blog hop...
Sandra - http://skyescreativechaos.blogspot.com
Carolyn - http://artisanwhimsy.com/profiles/blog/list?user=07ase2t9q0suy
Kay      - http://kayzkreationz.blogspot.com
Jana     - http://lasjoyasdejana.blogspot.com
Alenka  - http://pepita-handmade.blogspot.com
Rose    - http://handedcraftedjewelrybyrose.blogspot.com
Melissa - http://beadrecipes.wordpress.com
Malie   - http://kumifisher.blogspot.com
Connie - http://artisanwhimsy.com/profiles/blogs/creative-bead-chat-2000-thank-you-blog-hop

 And to sign off...THANK YOU CBC! We love you!


Sunday, September 15, 2013

Pearls! Pearls!! Pearls!!!

My buddy Michelle of MishelDesigns is a treasure trove of knowledge as far as pearls go (and I bet she knows a lot about a lot of other things too!)

Exactly a month ago, she announced a blog hop to celebrate her beloved pearls (she has a diploma in pearls from the Gemological Institute of America!). The challenge was to design something with pearls...any kind (there are so many, I get dizzy just thinking about them!), real or imitation, as many or as little, and any form of jewelry. For the reveal, she requested the design and the source of the pearls.

I jumped in, not quite sure what I would do. Maybe a ring? Since I have not really ever made one?
And then happened my dead-internet-saga and I forgot all about it until I received an email from the lovely lady giving us further details about the hop.

Shamefaced, I thought I was too late, and will have to bow out of it. But then last night I decided I had to make at least something! She didn't put too many rules in, and I have used them before, not as a main focus, but yeah, I have used them.

Then my brain dug up the visual of a bracelet I had thought of a looooong time ago, when the components all just happened to sit next to each other (I was not even using them for what I was doing at the time!)
I heaved a sigh of relief and quickly whipped up this....


The focal is a very interesting ceramic tube bead by Marti Conrad of Marti's Buttons-n-Beads.
She had sent it to me as part of the gift from the bead fairies of Project Bead.

The pearls are keishi pearls (I am giggling as I write this, as I have a Japanese friend by that name at work), gifted by Marla Gibson of Spice Box Designs, also as part of Project Bead. The silver spacers are also gifts from my bead fairies!

I was really tempted to add some color to this...maybe bright yellow or green, but thankfully, better sense prevailed.

The bracelet is 7.5 inches long and looks super pretty :) 

And as is always the case with my designs, some beads I bought from Emma Todd of A Polymer Penchant were just sitting there doing their own thing, and I ended up making these...
The beads I used here are gifts from her :-) Yeah, I have super awesome friends! I am blessed that's for sure!!


The earrings on the daintier side...just shy of 1.5 inches from the top of the earwire.

Both these pieces are for sale. The bracelet: $25 + shipping, and the earrings are $15 + shipping. So let me know if you are interested :-)

There are whole bunch of super talented ladies who joined this hop. Pearls are so versatile, they can be used and strung and coiled and done-whatever-you-want-with! All these ladies have very unique styles, and its definitely a visual feast! So go on and have a look!

Sadafulee,…Always in Bloom <-- You Be Over Here


Friday, September 13, 2013

Focus On Life ~ Week 37 ~ In Motion

This week's prompt says:

Get moving and a grooving this week!
Stretch those creative muscles and capture things in motion.

And hence, I present this....(stretched more than my creative muscles for sure! And I had to work hard to bring into motion the thing I had captured ;-) )


Wednesday, September 11, 2013

2nd Annual Challenge Of Travel ~ Santa Clara County and California in general!


Gosh, I am SO late for this one!!!! The reveal was on August 31st, and I finished making my piece a couple weeks before that. I was all set (and excited) for the reveal, and some time around August 21st, my home internet connection decided to die. It was resurrected only yesterday, so here I am with my post!

What's it about?

Erin Prais-Hintz of Tesori Trovati had put out a call in the beginning of August to join the "staycation" edition in her "Challenge of Travel" series. We were to explore what our hometowns had to offer for visitors. Hometown could be anything...the town you grew up in, the town where you live now, any place you call home.


I was torn about "where" home is! In my heart, its always, always, always going to be India (and in my mind, when I say, I want to go home, I will always mean I want to go to India) But in reality, and for all practical purposes, home is California. So this is about California! And it is more about the history of California than present day California. Hope that is ok!

Narrowing down to where I live...Santa Clara. Silicon Valley. We have so many tech companies headquartered right here. Google, Facebook, Apple, Cisco, eBay, PayPal, LinkedIn...just to name a very select few. I guess being a tech hub is what my hometown is well known for. But I would like to step back into history and speak about the actual street that I live off of.

El Camino Real ~ The Royal Road! Before I begin singing its glories, I have to admit that I hate driving on it. With that taken care of....

This is a historical road, stretching from San Diego in Southern California to Sonoma in Northern California, connecting 21 Franciscan missions. However, the road’s importance and its name recognition have far outlasted that of the missions it originally served.
Here is more information about the road: History Of El Camino Real

*this part of my post is copied from wikipedia*
In 1892, Anna Pitcher of Pasadena, California initiated an effort to preserve the as-yet uncommemorated route of Alta California’s Camino Real. Given the lack of standardized road signs at the time, it was decided to place distinctive bells along the route, hung on supports in the form of an 11-foot (3.4 m) high shepherd's crook, also described as "a Franciscan walking stick."
*end of wikipedia excerpt*

These bells have always fascinated me...and are a very prominent part of my design.
Here's a picture of the bell over at the mission in Santa Barbara. This is the only picture of the bells that I have managed to click.


Here's a better version, not clicked by me. Click on the picture to go to original website:


Next thing that I took inspiration from for my piece...is the land here! My neighbor, who has lived on this street for close to 60 years now, says that the region was all orchards! Oranges and plums and figs! Even now, the soil is rich and extremely fertile. There used to be a huge orange orchard near my office, actually right across the street from a big Sony campus. It was a gem in the middle of the city, oranges for as far as the eye can see. I bet you noticed the past tense here. Yeah, its gone, there are apartments there now :((

Here's a picture of my own orange tree...


And the last bit of inspiration...I thought about this for a long time...what is my state known for? What does it say on the license plates? Golden state! So yeah...the last bit is the gold :) Although, I don't know of any gold panning being done where I live...I had use this bit of info about my state :-)

So...here are my earrings that I made for this challenge :-)


 These are for sale, although not on my shop. Please send me a message if you are interested :)

There was an inlinkz code for this, but since I am late..its closed :((
Please visit Erin's blog to see the other entries
http://treasures-found.blogspot.com/2013/08/2nd-annual-challenge-of-travel-stevens.html.


Wednesday, August 21, 2013

Lets Learn Together ~ Polymer Clay ~ Conditioning


Previous posts in this series:


Last night, I got "all" my essentials in place and thought I would condition my clay.
You must be wondering why the "all" is in quotes. Keep reading and you will know.


That's my tile (not completely white, but this is all Home Depot had, and I did not have the patience to shop around), my clay (I had a pack of Sculpey III that I bought a few years ago, and I thought of trying it out before buying the Premo.), my pasta machine, my notecard is outside the frame, but its there.
I started off with cleaning the tile with 409, and then I assembled the pasta machine.

The instructions were very simple. 1 is thickest setting, 9 is thinnest. Pass some wipes through the machine before first use to clean up any dirt in the rollers.

Now I realized I did not have wipes. So I decided to improvise. I sprayed some 409 on a paper towel and passed that through the machine. Towel came out clean, so I was happy.

Then I picked the clay. The colors are nothing exciting, so I decided to make something black and white. Picked out the white first. Cut it with the tissue blade.

Mistake 1:  I should have cleaned the tissue blade as well before the first use. The clay had small black streak where it was cut. But I did not notice this at first. I cut the block into three sections...umm...cross-sectional pieces (sorry, don't have pics, will take pics with the next batch) and passed it through the roller.

Mistake 2: I had not clamped the machine down to the table. So I had to use one hand to hold the machine. I could have used it to guide the clay properly instead.

BIG Mistake: See for yourself!


Yup! The machine was DIRTY!!!
But my lazy brain said...oh well...you wanted black and white beads, didn't you? Yup, a true blue lazy brain! It also said, this bit is ruined anyway, so just work with it and see how you can condition Sculpey III. I suppose there is a point to that argument.

So well, I continued. I passed each of the three sections through the machine, then two together and then all three together, then folded them in half and passed them through the machine, maybe 3-4 times. I must say, the clay was really soft. Much softer than the Premo that I worked with in my class. I am going to attribute that to a very hot day (and the hard Premo to AC turned up really high at the class)

I rolled my clay at setting 3. Not the thinnest, since I didn't really need it to be super thin. The sheet in the picture above is probably taken after the final run (you can tell, I don't do instructions very well :( )

The next step was to roll this into a log, making sure it was a tight roll and no bubbles.

I rolled it up and then just rolled the log some more on my tile. Yeah, I know its ugly and dirty.

I cut off some clay from the narrow end and made a nice round ball out of it. The clay was super soft so I had no issues forming it. Ok...so far, going ok, But at this point all I had was a dirty white ball. What to do with it, what to do with it? Ok, lets flatten it. Done. Now I have a dirty white disc. So then I thought of stamping something into it. So I did that.


Yup, super soft clay with a large thumbprint. And the bead had gotten kinda thin at this point, and I didn't know what else I could even do with this. So I poked a hole into it and called it done. I should have waited for it to harden a bit, it was, I think I did mention this, super soft).

This much got done very quickly. So I cut off another piece of clay from my log, and made another dirty white ball. Figured I will carve something on it. All I managed to do was poke some holes with my bead reamer. And the clay was super soft (oh, right, I did tell you that already), so every time I turned the bead to poke a hole, I got a small flat surface on the bottom. End result was an accidental faceted look :) But that felt like cheating, so I smoothed it back into a nice round dirty white ball. Here it is...


I have not baked these yet. Didn't feel like heating up the oven for just these two little things.
Not sure what I will do with them once I bake them, but I think I should.

So here are the lessons I learned:

Clean everything! Tile, hands, knife, roller, pasta machine...evvvvvverything!
Clamp the pasta machine. This one is a bit funky, as in the handle went below the bottom of the machine. So I had to have it hanging off the edge of the table. Not comfortable!
Watch the temperature of the room and my hands and all that...
Plan on what I want to do before rolling out that poor clay. I had no clue what to do next after I had my sheet!

I did buy some wipes today, so I should be ready for the next round.
I think I will try some color mixing or marbling technique next.

Here's a video on color mixing


And this one is for marbling...

Am not able to link it here, but here's the URL:
http://www.youtube.com/watch?v=hkTJodC5qL8

I have not yet watched these videos completely, just skimmed through them. They looked good.

Until next time....seeya!

Monday, August 19, 2013

Lets Learn Together ~ The Essentials Follow Up

Previous posts in the series:

Before I get into the post, let me apologize for not following up sooner.
The internet connection at home has decided that it will work only from Monday-Friday, 9am to 5pm! Not really sure why, and we (we being the hubby) will hopefully call AT&T today to get it fixed. I was kinda okay with not having internet after work hours. It "felt" different. I could see other chores that needed doing and so on. But enough of that break! I need my connectivity back!

So...moving on. There were a lot of good comments and questions coming in after I posted the essentials. Will sum them up here.

First, a BIG thanks to Emma Todd for writing up a whole blog post for us with some of her tips.
Click on the picture to read it:


Now on to comments:
About rollers and pasta machines:
From Val Tilghman: We can use acrylic brayers for rolling! And the big tip: Michaels and JoAnn accept coupons from other art and craft stores!
From Gina Hockett: PVC pipe works just as well for rolling out clay!

About clay:
From Monique: I mentioned that I thought Kato clay was very hard to work with. And she said this:
The old Kato formula was extremely firm, but I think all brands have gotten a little softer across the board when a certain questionable ingredient was removed. Different brands suit different people.  For example, I have really warm hands and I am quite rough with my PC, so Premo gets very soft after this torture. To the point where I have trouble keeping canes from turning to mush Emoji. So it is best to be patient and give Premo lots of resting time between stages, so you will get a better result. Keep a freezer pack at your worktable to cool your ceramic tile, or refrigerate several tiles to always have a cool work surface.

This reminded me of my class. I have freezing cold hands, and the other student had very warm hands. My beads took a while to form, and hers were mush in no time! Teacher suggested her to have a cold water bath next to her to cool her hands down. And me? I guess hot chocolate!

Marlene has sent me a whole document describing various clays and their properties. I will put that up in a separate post. Thank you, Marlene!!

About Wax Paper:
Marlene said this:
When your instructor mention wax paper, I think she must have meant deli paper. Regular wax paper has too heavy a coating which can react with your clay. Also plastic containers or drawers that have a 2 rating on the bottom (all plastic should be rated) are perfectly safe to store Polymer Clay in. Use them all the time.

About Storage:
Emma said this:
 I am not picky about my polymer being stored in airtight containers since it doesn't dry out. More important that it be covered. For instance I have some sitting on what amounts to a covered shelf, for years, dust follows gravity, unless you interrupt so as long as it's covered it's good, in my books


Kelli said this:
I just store my clay in zip lock baggies with as much of the air removed as possible and so far so good
Kelli actually had a lot of good tips on all the topics, do check them out in the comments section.

About Glazing:
Gina had a question about what glazes to use, and here is Marlene's response:
There are lots of glazes out there, just like brands of clay. Kato glaze is considered to be the "glossiest' and clearest(also the pricest). Sculpey has two glazes, High Gloss, and Satin, which both work well for the "finish" you are looking for. A lot of people sand and buff their creations to a high sheen and don't add anything further, and still others swear by the use of Pledge acrylic Wood Floor Care, which use to be know as Future Finish.

I have also seen Liquid Polymer Clay and nail polish mentioned, but I have not researched it yet. I bet when I do though, I will find what Marlene said :-)

That's that for now, peeps!
I am hoping my pasta machine arrives today!


----------------------------------------------------

Previous posts in the series:

Focus On Life ~ Week 33 ~ In Season!

Am laaaaate posting this, but better late than never, right?

This week Sally asked us what's in season where you live?
Lots of things!!

Flowers and fruits....this is my neighbor's front yard. Can you believe those big pomegranates! And the pink flower is as big as my head!


Bikes (and garage sales!)
This was a straaaaange bike...


Convertible cars....that's my nephew in my beloved car that I sold off last month...


Boats! Yeah, yeah, I know it should be on water and not parked like this on the street. I bet its on its way though ;-)


Colorful clothes!


And lastly, the big thing for me right now...walking as I try to get my knees back in shape!


And here's what everyone else has in season!

Friday, August 16, 2013

Lets Learn Together ~ Polymer Clay ~ The Essentials

Alrighty....so....what do we need to get started? The very basic, essentials, must-haves?

Number one on the list is going to have to be, yeah, you guessed it, CLAY!

What to buy: CLAY
There are a lot of different brands available, all with different properties.
These websites have a good description of everything that is out there...and both conclude that Premo! Sculpey is the best one out there.


Where To Buy:
The picture above goes to Amazon. Amazon has been my go-to place for most of my supplies. But you can also get it at Michaels, Hobby Lobby, JoAnn, etsy, eBay, and any other art and craft shop.

-------------------------------------------------------------------------------------------------------

What to buy: Work Surface
My teacher, Eriko Page, recommends a ceramic tile. A white one. These are easily available at home improvement stores such as Home Depot, Lowes, etc.
One other recommendation I have seen is a sheet of glass with sanded edges. This helps when you want to do image transfers. But for now, I think I will go with ceramic tile.

Another essential is notecards. These need to be blank, unlined. These are to be used for when you need a non-stick work surface, like then cutting canes, laying out pieces you have already worked on and are waiting for baking. It is also needed for placing in the oven.

Where To Buy:
Tile: Home improvement stores
Card stock: Dollar store, Walmart, Office supplies store, etc

------------------------------------------------------------------------------------------------------- 

What To Buy: Rolling Tools

A pasta machine is highly recommended. It is invaluable for conditioning the clay, flattening it, removing air bubbles, etc. It is not a must, I suppose you could roll it by hand with an acrylic rolling pin. Since rolling out anything is not my passion, I will definitely be buying a pasta machine. In fact, Amazon just sent me an email that this is on its way :-)

Acrylic or Glass Rolling Pins are also recommended, but I am not sure where to buy them. I bet Amazon has it, will get it if I really need it.

Where To Buy:
Amazon or any kitchen appliances store. I thought Michaels had it, but when I went there, they had no idea what I was talking about. JoAnn has it as well, but the one I got on Amazon (click on the pic above) is the best price I found. You could even check your local craigslist or garage sales!

-------------------------------------------------------------------------------------------------------

Cutting, Shaping and Piercing Tools:
I bought a tissue blade, which is a must, from my teacher. This will be used for cutting logs and canes.
An exacto knife helps while carving. I bet there are other cutting tools, but these should be good to start with.

A wide variety of clay shaping tools are available. I like this set available on Amazon.


Not quite sure what they will be used for yet, but we will find out soon :-)

And lastly, piercing tools. The tool set I bought from my teacher included a bead reamer. Which is very good, but I am thinking not quite an essential. You could use just about anything to do the piercing. Here are some suggestions I read in my book: sewing and darning needles for piercing, large tapestry and wool needles for smoothing and sculpting, dried up ballpoint pen refill for making larger holes.

Where to buy: Amazon, Michaels, JoAnn, any other craft store

-------------------------------------------------------------------------------------------------------
 What To Buy: Cleaning and Storage
A box of baby wipes is what my teacher recommends. Always clean your work surface and your hands before handling your clay. 

For storage, she recommends wrapping the clay in wax paper and storing in airtight containers. NEVER wrap in regular paper, or anything porous, it will suck up the "plasticity" of the clay.
One of the books mentioned that some types of clay react with plastic so it is safer to store in tin containers, but I think as long as they are properly wrapped in wax paper, you are good.

Where to Buy:
Grocery stores :-)

-------------------------------------------------------------------------------------------------------

What To Buy: Toaster Oven
Now this is the most debatable one. To buy or not to buy. I had about 50% folks say a toaster oven is necessary, and the other half say its not. So it really does boil down to a personal decision.

What did I decide: I decided to use my regular kitchen oven...for the following reasons:
  • I have heard, the bigger the oven, the better the distribution of heat, and hence, better baking
  • Very minimal chance of burning
  • I don't have space in the house for yet another appliance
  • I actually don't use my kitchen oven that much
So what do I do about the "fumes"? Here's an excellent recommendation I got which I used quite successfully:
Place lots of paper on a cookie sheet...make sure nothing is printed on it! Or you can use printed paper and then a layer of card stock on which you will place your items to be baked.
Cover it with a foil pan, and hold it together with binder clips. This is good enough to contain the smells!

Where to buy: 
I looked up craigslist for the toaster oven and did find some good new-in-box deals. That could be a good source if you decide to buy one.
Foil pan and binder clips: Just about anywhere :-)

-------------------------------------------------------------------------------------------------------
What To Buy: Sanding Material
The final "essential" step after baking is sanding. 
You definitely want to "wet-sand" your beads! Meaning get the bead wet and then sand them.
I got two recommendations for the sanding material:
Sand paper: We need to start with coarse grit and then go down to finer. The most recommended sizes are 400/600/800/1000/1500/2000
You definitely want the "Wet/Dry" kind. These are available in auto shops, and also on, yes, Amazon!
I got these two assorted packs:
This first one has 1000, 1500, 2000 and 2500 grits


And this one with 220, 400, 800 and 1000 grit


 The other recommendation I got, and I bet this works much better for the beads are these: Micro Mesh Soft Touch Sanding Pads! The name itself sounds so good :)

Much nicer, and unfortunately, more expensive :( I will get these once I get better at making beads!

Where To Buy: Amazon, Auto Shops


-------------------------------------------------------------------------------------------------------

What To Buy: Buffing Tools
You don't really need to buy these. You can simply use your old denim to buff up your beads :-)

-------------------------------------------------------------------------------------------------------

Books and Resources: 
These are recommendations I got from Marlene, I need to check these out SOON!


This last one is a bit advanced...


And finally, the book I have been referencing for writing up this post:


-------------------------------------------------------------------------------------------------------

And lastly, the EXPERTS! (in no particular order)
Marlene Cupo of Amazing Designs
Emma Todd of A Polymer Penchant
Lisa Caryl of West Street Studios (one of the very few friends I have actually met in person! Need to get her blog/shop address)

All of them have been guiding me (enabling me, lol) ever since I decided I wanted to do this! Thanks for holding my hand, ladies! You rock!!!

Tuesday, August 13, 2013

Lets Learn Together ~ Polymer Clay ~ The Lessons

EDITED TO MAKE THE SCHEDULE MORE DOABLE

Looks like I have piqued the interest of quite a few fellow newbies. Excited much, yippeee!!!

So this is what I had in mind as far as lessons:

  • Week 1 - Gather the essentials + Learn the terminology
    • I figured we could get familiar with the tools and techniques and names at least in theory while we wait for our "essentials" to arrive. We will share websites and book recommendations and tutorial links and all other kind of resources.
  • Week 2 - Basic Techniques
    • Conditioning
    • Making basic snakes and logs and simple canes (jelly rolls?)
    • Making basic bead shapes - round, rondelles, disc, bicone, cylinder, cabochon, tube, any other geometric shapes :)
    • Baking 
  • Week 3 - Basic Finishing Techniques 
    •  Sanding, Buffing
    • Sealing - Do we need it? This could be an advanced topic
    • Make something with the new beads :)
  • Week 4 - Advanced Techniques
    • Marbling
    • Color Mixing - skinner blends
  • Week 5 - More techniques
    • Cutting/Carving - To make faceted beads
  • Week 6 - Canes
    • Complex cane designs - would be fun if we could make our own patterns :)
  • Week 7 - More canes!
    • Make canes and use them to stick them on things :)
  • Week 8 - Texture
    • Stamping
    • Braiding (manipulating snakes)
    • Get creative with what you can do with those snakes!
  • Week 9 - Embellishment
    • Painting
    • Enamel Effects
    • Metal Effects
  • Week 10
    • Bangles and rings!
    • Learn how to attach wire to your creations to make pendants with bails, headpins, etc
  • Week 11
    • Show off week :)
These are just some thoughts I have had while typing up this post, and looking at the table of contents of a book I borrowed from the library today.
Please do chime in and share your ideas and suggestions as to what else we could do here :) All of us are teachers as well as students!

I am also hoping to rope in a few of my friends who have been working with PC for a while and whose work I am in awe of to be the panel of experts. The idea is that you guys will send me questions and I would forward them to the panel, and we can get advice and opinions from all of them, which I would compile and write up into a blog post.

I will also start a pinterest board to pin tutorials for each week of learning.

Ok, so I am getting thoroughly excited about this now! Can't wait to start!

Lets Learn Together ~ Polymer Clay!


So I have finally been bitten by the polymer clay bug! I had been thinking about it for a looooooong looong long long time, but did nothing but think.
Then, some time in late July, I saw a post by Unicorne Beads on Facebook about a bead show they were going to be at...and one of the venues listed was only an hour away from me.

I checked it out and decided to go. It was this show called Bead & Boutique Arts Show. It was a 3-day event, and I had decided to go on the Saturday. My knees have been giving me trouble lately, and on Friday night, I was wondering whether I should drive the 1 hour, then walk around all day and drive back. Saturday morning, I was still in two minds, but finally decided to go and not think about it anymore. I looked up what classes were being offered that day, and found a polymer clay one, by Eriko Page. Not someone I had heard of, but decided to sign up in any case. 

Eriko is an excellent teacher, with 15 years of PC experience. I could not find a website for her, but here's her page on FMG.

She taught us three styles of beads, flat disc bead, cylindrical and cabochon. Here is what I made:

The top blue bead is the teacher's sample, and the little flower is from one of her canes.

So.......now I am hooked, and am wondering who wants to learn more with me?

I am thinking of weekly"lessons", with the schedule something like this:


Week 1 - Gather all the required materials
Week 2 - Learn conditioning, basic canes, skinner blends etc
Week 3 - Basic bead shapes, baking, sanding
Week 4 -  Embellishing

And so on. I have yet to think about how this will exactly go, but am definitely doing it, and would love to have some friends join me in! I have been pinning tutorials and will be checking out books, etc. And posting things that I find interesting...

So who is in?

Sunday, August 4, 2013

Fresh Shop ~ She Flies Again

Here I am with another "fresh shop", and this time there will be no "disclaimer" of not knowing the artist :-)
A bunch of you from the CBC group on Facebook probably know her. She is a newbie, an extremely talented one, and jumped into jewelry making after she bought a pair of earrings from me, and we started talking about the creative process.

Ok, enough with the suspense :-) Its our very own Norbel Marolla, and she opened her shop She Flies Again today on etsy.

Her style is rustic and earthy, and she has a amazing taste in picking out artbeads...like in this pair of earrings:


and has an amazing sense of color...love this necklace..again, made with gorgeous art beads


Before she thought of starting her own shop, she asked if I would be interested in making this a sort of "collective", where I would also list some of my work. I agreed, and while I don't have anything listed there yet, I do have a few creations I will be adding in here.

And lastly...about the name of the shop. She had mentioned there was a story behind it, but I did not know what it was before she opened shop today. Its a beautiful story, one you should definitely read!
About She Flies Again

Go on...I know you want to look, and I promise you will be tempted by soooooo much good stuff, at amazingly reasonable prices!

Here's to you, Norbel!

Friday, August 2, 2013

Summer Color Inspiration Challenge

My bead mommy, Sharyl is hosting a quick blog hop this week...inspired by the colors of summer. Which are brilliant, vibrant, happy colors :)

She gave us a bunch of inspiration photos, pointed out the colors in them, and we were to pick one (or more) of them and create something.

I am on a yellow binge lately, so I picked this one:


The colors she mentioned were: bright yellow, raspberry and lime. I told her I didn't like the raspberry intruding in here, I want only lemon and lime :)

And here's what I came up with. I surprised myself with this super simple design (I tend to complicate things all the time ;-)


Do I like 'em? Love 'em! They are happy happy things! And I think they go well with this necklace...don't they? Its like an entire summer garden, haha :-)

I wondering if I should change the beads in the necklace and use yellow ones instead!


Thanks for the inspiration and for hosting, Sharyl :-) These earrings make me happy :D

Here are the other participants...
Sharyl McMillian-Nelson     Sharyl’s Jewelry    (Host)  
Kashmira Patel   .....    Sadafulee...always in bloom!  <--- you are here  
Lisa Lodge   .....   A Grateful Artist - Pine Ridge Treasures
 Tanty Sri Hartanti   ....   TJewellicious by Tanti       
Kathy Lindemer ....  Bay Moon Design   
Laren Dee Barton ... Laren Dee Designs     
Melissa Trudinger  ... Beadrecipes